Étape 1 : préparer
Qu'est-ce que c'est ?
Utilisez votre BBC micro:bit pour déterminer quel matériau est le meilleur isolateur thermique.
Ce projet est développé en partenariat avec White Rose Science pour les professeurs de sciences ; il permet aux élèves de comparer les matériaux de tous les jours en fonction de leurs propriétés. Les élèves peuvent également apprendre à enregistrer des données et à utiliser des boucles, des séquences et des variables simples dans les programmes informatiques.
Cette vidéo explique le fonctionnement du projet et la manière de réaliser l'expérience.
Comment ça marche
- Cette expérience nécessite deux programmes différents sur deux micro:bits : les programmes de capteur et d'affichage.
- Le capteur micro:bit fonctionne comme un enregistreur de données et enregistre sa propre température. Il envoie également ses lectures de température à l'écran micro:bit chaque minute par radio.
- La partie affichage affiche la température du capteur micro:bit.
- Vous enveloppez le capteur micro:bit dans un matériau isolant que vous voulez tester et le placez dans le réfrigérateur.
- Lorsque le capteur micro:bit est suffisamment froid, vous le retirez du réfrigérateur et commencez à enregistrer les données, ou vous effectuez des relevés manuellement, afin de voir à quelle vitesse il se réchauffe.
Ce dont vous aurez besoin
- morceaux de matériau à tester, tels que du feutre, du papier bulle ou du film alimentaire
- deux micro:bits
- au moins 1 pack de piles
- ruban adhésif ou trombones pour maintenir le matériau enveloppé sur le micro:bit
- accès à un réfrigérateur
- un chronomètre ou une minuterie
- un ordinateur/ordinateur portable/tablette et un câble USB pour vous permettre de voir les données
Étape 2 : se renseigner
- Téléchargez les fichiers Hex et mettez le code sur vos micro:bits, une fois que vous aurez lu le point 2 ci-dessous. Vous n’avez pas besoin d’écrire vous-même le code de ce projet pour réaliser l’expérience, mais si vous souhaitez le coder, visitez la section Étape 4: Codez-le ci-dessous.
- Si vous faites cette expérience dans une classe ou un club de codage, chaque paire de micro:bits doit avoir des numéros de groupe radio différents. Cela garantira que l'affichage micro:bit reçoit les lectures du bon capteur micro:bit. Ouvrez le projet dans Microsoft MakeCode et entrez un numéro unique dans le bloc de groupe de radio, puis téléchargez le code sur deux micro:bits. Gardez-les ensemble avec un élastique ou dans un petit sac. Répétez l’opération pour chaque paire de micro:bits.
- Fixez une batterie au capteur micro:bit.
- Enveloppez le capteur micro:bit dans le matériau que vous souhaitez tester et placez-le sur une assiette au réfrigérateur pendant une heure. Pour garantir un test équitable lors de la comparaison de différents matériaux, utilisez toujours le même nombre de couches.
- Retirez le capteur micro:bit du réfrigérateur lorsqu'il atteint la même température de départ à chaque fois que vous effectuez l'expérience. Appuyez sur le bouton B de l'écran micro:bit pour connaître la température du capteur micro:bit. Vous pouvez probablement le faire avec la porte du réfrigérateur fermée si vous êtes suffisamment proche du réfrigérateur!
- Retirez le capteur micro:bit s'il est suffisamment froid. Retirez-le du réfrigérateur en le tenant par l'assiette, car vos mains pourraient le réchauffer.
- Commencez l'enregistrement des données en appuyant sur le bouton A du capteur micro:bit.
- Maintenant, à l'aide d'un chronomètre ou d'une minuterie pour garantir la précision, prenez des mesures manuelles de la température du capteur micro:bit toutes les minutes en appuyant sur le bouton B de l'écran micro:bit.
- Terminez l'expérience après dix minutes en appuyant sur le bouton B du capteur micro:bit pour arrêter l'enregistrement des données.
Astuces
- Vous souhaiterez peut-être exécuter une expérience sur un micro:bit qui n'a pas été enveloppé dans un matériau, pour servir de contrôle. Vous pouvez ensuite comparer ces résultats aux résultats de micro:bits qui ont été enveloppés dans différents matériaux.
- Cette expérience ne fonctionne pas bien avec une feuille d’argent, car elle peut bloquer les signaux radio du micro:bit ou même l’endommager.
- Les micro:bits se réchauffent rapidement quand vous les retirez du réfrigérateur. Effectuez l'expérience dans la cuisine de votre école ou déplacez-les dans votre salle de classe dans un sac ou une boîte sympa.
- Si vous devez effectuer l'expérience une deuxième fois en utilisant la même paire de micro:bits, supprimez les données du capteur micro:bit en appuyant simultanément sur les boutons A et B. Vous devez également appuyer sur le bouton de réinitialisation à l'arrière du micro:bit pour remettre l'heure en minutes à 0.
Étape 3 : analyser
Pour consulter les données enregistrées, déconnectez la batterie et rebranchez le capteur micro:bit sur un ordinateur. Le micro:bit apparaît comme une clé USB appelée MICROBIT. Regardez dans le lecteur MICROBIT et ouvrez le fichier MY_DATA pour voir un tableau de vos données dans un navigateur web :
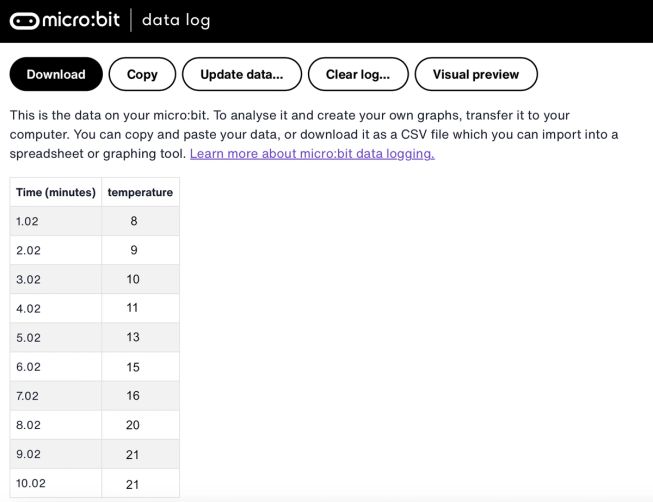
- Les horodatages dans le journal représentent la durée écoulée depuis le début de l'enregistrement des données.
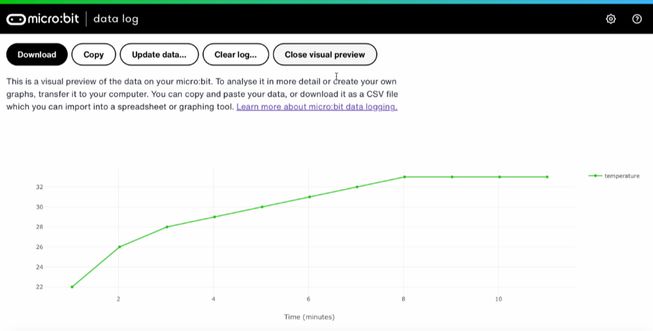
- Cliquez sur Aperçu visuel pour voir un graphique de vos données:
- Vous pouvez également cliquer sur le bouton Copier puis coller vos données dans une feuille de calcul.
- Vous souhaiterez peut-être comparer les données que vous avez collectées manuellement avec le journal du micro:bit pour décider laquelle est la plus précise.
Étape 4 : programmer
Regardez cette vidéo pour savoir comment coder le projet :
Si vous êtes intéressé à modifier le code de ce projet, cliquez sur les boutons ci-dessous: