Before using a screen reader with Microsoft MakeCode for micro:bit, students should have experience of:
- touch-typing including using Control and Shift as modifiers, be able to find Tab, Enter and Backspace as well as arrow keys and number keys.
- reading and creating documents with a screen reader and know what their screen reader key is (often Insert or Caps Lock).
Visit the webinar video recording to access an introduction to screen reader compatibility in MakeCode.
How to get started with using a screen reader with MakeCode
Press Tab and then Enter to ‘Skip to Blocks workspace’. Alternatively, you can reach the workspace at any time by pressing Control + B on Windows or Command + B on Mac, then 4.
To enable screen reader mode from the workspace, press Alt + Shift + A on Windows or Option + Shift + A on Mac. Screen reader mode includes features such as hard stops instead of wrapping when navigating blocks and beeps when changing container nesting levels.
More details of the functionality are provided within the Microsoft MakeCode Accessibility Statement. The resources below will help you get started.
Getting started with screen reader activities
The following activities are designed to introduce screen reader users to the BBC micro:bit. These activities have been designed with and for blind and sighted educators. The activities can be used directly with students to introduce them to block-based coding in MakeCode for micro:bit.
They can also be completed by a teacher or teaching assistant of blind and visually impaired learners and adapted for existing lessons or to create new ones. All the resources are editable to suit specific requirements.
The activities use optional tactile and text-based resources to familiarise learners with the vocabulary and concepts used in the MakeCode editor. The activities can be spread over multiple sessions, as needed.
In these activities, instructions are given for Windows users. Mac users should use Command instead of Control and Option instead of Alt when using keyboard controls.
After completing the six getting started activities, students and teachers will be able to complete other projects that use the MakeCode for micro:bit editor, adapting visual outputs for audio outputs.
Teachers will need to review the activities in advance and prepare tactile resources as well as download a welcome program onto micro:bit devices. The activities include:
- Beginner text tour of the micro:bit supports tactile exploration of the device.
- Welcome to the micro:bit uses a powered up micro:bit to explore relevant features of the device.
- Start sound introduces block-based programming where students navigate an existing project in MakeCode and modify the program.
- Doorbell introduces adding blocks from the toolbox and moving blocks in the workspace.
- Shake alarm introduces creating a complete project from the MakeCode homepage and working with ‘repeat’ blocks.
- Mood music introduces using replaceable inputs and adding ‘else’ and ‘else if’ branches to ‘if’ blocks.
Explore the micro:bit device
What can the micro:bit do?
Read and change your first code
Add code blocks from the toolbox
Create a complete project
Use ‘if’ blocks and replaceable inputs
Additional resources
- Join Lucy Gill, Head of Product at the Foundation, for the Screen reader compatibility in MakeCode webinar (Thursday, 1st October 2026) – a demonstration of screen reader in MakeCode and a presentation of the getting started resources.
- Resources for the activities are available to customise.
- 3D Tactile Coding Blocks for the resources for the activities be downloaded as STL files to print on a 3D printer. This is a third-party website and not endorsed by Microsoft or the Micro:bit Educational Foundation. To report incorrect or inappropriate content please email reporting@microbit.org.
- Inclusive projects with sounds and images may be valuable for students with visual impairments.
FAQs
Screen reader and braille displays
Which screen reader software are supported?
Which screen reader software are supported?
Can students use a refreshable braille display?
Can students use a refreshable braille display?
Can a screen reader be used with students who are not visually impaired?
Can a screen reader be used with students who are not visually impaired?
micro:bit
Can students touch the micro:bit components?
Can students touch the micro:bit components?
How can students orient the micro:bit?
How can students orient the micro:bit?
How long should the USB cable be?
How long should the USB cable be?
Can we use V1 micro:bits?
Can we use V1 micro:bits?
Can we make the micro:bit louder?
Can we make the micro:bit louder?
Resources
Which version of braille is used?
Which version of braille is used?
What braille font size is used?
What braille font size is used?
Can the getting started activities also be used with sighted users?
Can the getting started activities also be used with sighted users?
MakeCode
Tab doesn’t take me to the ‘Skip to Blocks workspace’ link
Tab doesn’t take me to the ‘Skip to Blocks workspace’ link
The screen reader is not reading blocks correctly (caret browsing)
The screen reader is not reading blocks correctly (caret browsing)
Can I download a program to my micro:bit with a screen reader?
Can I download a program to my micro:bit with a screen reader?
How do I interrupt the screen reader?
How do I interrupt the screen reader?
How do I add ‘else if’ branches to an ‘if’ block?
How do I add ‘else if’ branches to an ‘if’ block?
To add an ‘else if’ branch to an ‘if’ block, you first need to add an ‘else’ block using the add button.
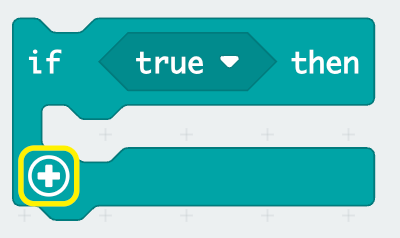
When you use the add button again it will add ‘else if’ branches.
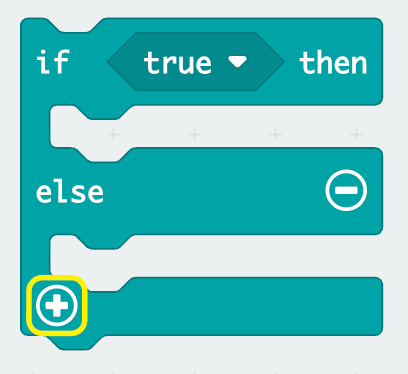
You can delete the ‘else’ branch if you do not need it, but the next use of the add button will add an ‘else’ branch before further ‘else if’ branches can be added.
MakeCode simulator
Can the simulator be used with a screen reader?
Can the simulator be used with a screen reader?
Why has the touch logo appeared in the simulator?
Why has the touch logo appeared in the simulator?
Additional useful blocks
How do I use the ‘play melody’ 8 notes block?
How do I use the ‘play melody’ 8 notes block?
The ‘play melody’ 8 notes block is the first block in the Music section. The block has an interactive editor that can be used to compose a melody of eight notes and has a gallery of melodies that can be selected and loaded into the editor.
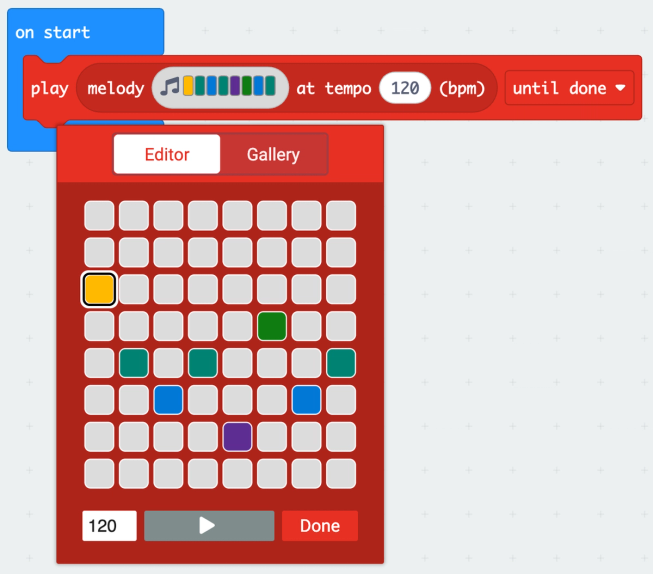
The ‘play melody’ 8 notes block has a melody input. The melody input has two parts: an input for the 8 notes and an input for the bpm (beats per minute). Press the right arrow key twice to move to the 8 notes input, initially it is empty, press Enter to open the editor.
Use the left and right arrow keys to move between the Editor and the Gallery.
Composing a melody in the editor
With Editor selected, press Tab to move to the note editor.
Use the left and right arrows to select the previous or next note in the sequence. If the note is turned on, it will play.
Use the up and down arrows to select the note pitch.
Press P to play the current note. Note that P will play the current note even if the note has not been turned on.
Use Enter or Space to toggle the note on or off. If the note is off then the melody will rest for that note.
When the note is turned on it will stay turned on when you use up and down arrows to change the pitch.
Press Tab from the grid to move to a control to edit the bpm (beats per minute), a button to play the whole melody and then a ‘Done’ button.
Choosing a melody from the gallery
Go to the Gallery, press Tab to move to the table of melodies.
Use the up and down arrows to move through the melodies.
To preview the selected melody press the right arrow key to move to the preview button and then Enter.
To open a melody in the Editor, select the melody and press Enter. The Editor will open with the notes of the melody. Press Tab to move to the notes editor to change the melody.
How do I use the ‘play sound effect’ block?
How do I use the ‘play sound effect’ block?
The ‘play sound effect’ block is the second block under the micro:bit (V2) heading in the Music section. It has an interactive editor. It also has a gallery of sound effects that can be selected and loaded into the Editor.
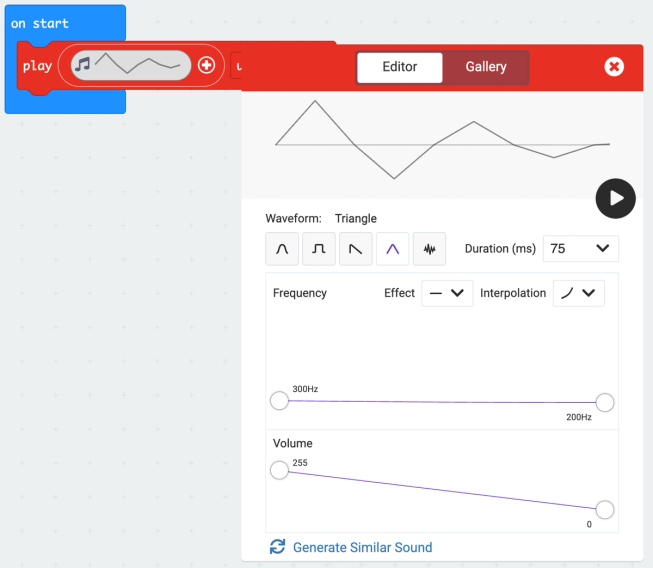
The ‘play sound effect’ block has an input with a sound effect input and button for revealing more options.
With a ‘play sound effect’ block selected, press the right arrow key twice to go to the sound effect input and press Enter to open the editor.
Use the left and right arrow keys to move between the Editor and the Gallery.
Composing a sound effect in the editor
When you add a new ‘play sound effect’ block, it has a sound effect, press P to hear it.
Press Tab to move to the Close button and then again to move to the Play button in the editor.
Keep pressing Tab to discover the settings that can be changed:
- Waveform: use left and right arrow keys to choose a waveform then Enter to select
- Duration of the sound wave is in milliseconds. Type a number or use up and down arrow keys to choose from a list of options.
- Effect: choose from a list of options
- Interpolation: choose from a list options
- Frequency start and end: use the up and down arrow keys and other standard slider controls
- Volume start and end: use the up and down arrow keys other standard slider controls
- Generate similar sound button: press Enter to change the options to create a new similar sound
Choosing a sound effect from the gallery
With Gallery selected, press Tab twice to move to the table of melodies.
Use up and down arrows to move through the sound effects.
To preview the selected sound effect, press the right arrow key to move to the preview button and then Enter.
To open a sound effect in the Editor, select the sound effect and press Enter. The Editor will open.