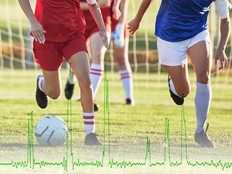
Créez un enregistreur IA de données sportives avec micro:bit CreateAI: il enregistre combien de temps vous et les autres passez à courir, à marcher et à rester immobile.
Guide de projet étape par étape
Étapes 1 : comprendre
Comment ça marche ?
Dans ce projet, vous allez entraîner un modèle d'apprentissage automatique (ML) à reconnaître une course, une marche et une position fixe.
Vous allez combiner ce modèle avec un programme MakeCode qui utilise la fonction d'enregistrement des données du micro:bit pour enregistrer une action chaque seconde.
Ce projet peut être utile dans des sports tels que le football ou le netball où vous devez analyser le taux d'activité de certains joueurs. Vous pouvez également l'utiliser pour surveiller combien de temps vous avez passé à courir ou à marcher pendant les pauses scolaires ou pendant une séance d'entraînement.
Qu'est-ce que l'apprentissage automatique ?
L'apprentissage automatique (Machine Learning en anglais) est une sorte d'intelligence artificielle (IA) où les ordinateurs peuvent apprendre et prendre des décisions basées sur des données.
Les modèles d'apprentissage sont formés par les humains pour les aider à prendre ces décisions, par exemple, pour reconnaître différentes ‘actions’ lorsque vous déplacez votre micro:bit de différentes manières.
Que dois-je faire ?
Les systèmes IA ont besoin d'êtres humains pour les concevoir, les construire, les tester et les utiliser. Vous allez collecter des données pour entraîner un modèle ML, le tester, l'améliorer et le combiner avec un code informatique afin de créer un appareil intelligent qui utilise l'IA. Vous utiliserez un micro:bit et le site web micro:bit CreateAI pour faire cela.
Étape 2 : programmer
Ce dont vous aurez besoin
- Un micro:bit V2, un câble USB, un pack de batterie avec 2 piles AAA
- Un ordinateur (de bureau, un portable ou un Chromebook) avec accès au site web micro:bit CreateAI, en utilisant un navigateur web tel que Chrome ou Edge
- Si votre ordinateur n'est pas équipé de la fonction Bluetooth, vous aurez besoin d'un micro:bit V2 supplémentaire.
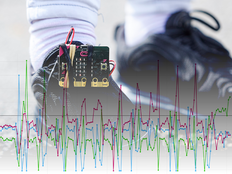
- Une sangle et un support, ou tout autre moyen permettant de fixer le micro:bit à votre poignet (par exemple, des tiges flexibles ou des élastiques).
- Vous trouverez peut-être également utiles nos conseils pédagogiques micro:bit CreateAI
Collecter des échantillons de données
Lorsque vous ouvrez le projet dans micro:bit CreateAI, vous verrez que nous vous avons fourni quelques échantillons de données pour les actions « courir », « marcher » et « rester immobile » :
walking
running
still
Vous pouvez ajouter vos propres échantillons de mouvement à l'aide du capteur de mouvement ou de l'accéléromètre du micro:bit.
Dans micro:bit CreateAI, cliquez sur le bouton « Se connecter » pour connecter votre collection de données micro:bit et suivez les instructions.
Fixez le micro:bit à votre poignet gauche comme une montre, avec le logo vers le haut. Cliquez sur la première action, « marcher », puis sur « Enregistrer » pour enregistrer vos propres échantillons de données. En cas d'erreur, vous pouvez supprimer les échantillons que vous ne souhaitez pas. Vous pouvez également appuyer sur le bouton B du micro:bit pour commencer l'enregistrement.
Si vous souhaitez enregistrer en continu pendant 10 secondes pour obtenir 10 échantillons, cliquez sur les trois points à côté du bouton Enregistrer et sélectionnez cette option.
Enregistrez maintenant vos propres échantillons de données pour l'action « en mouvement », puis pour l'action « immobile », en veillant à collecter des échantillons dans différentes positions pour l'action « immobile », par exemple face vers le haut et face vers le bas.
Entraîner et tester le modèle
Cliquez sur le bouton « Entraîner le modèle » pour entraîner le modèle, puis testez-le. Essayez de marcher et voyez si « marcher » est l'action devinée, puis courez pour voir si « courir » est l'action devinée. Restez immobile et voyez si « immobile » est deviné. Donnez votre micro:bit à quelqu'un d'autre pour qu'il le porte (en vous assurant qu'il le place sur le même poignet et dans le même sens) et voyez s'il fonctionne aussi bien pour cette personne.
Améliorer votre modèle
La plupart des modèles peuvent être améliorés avec plus de données. If the model needs improving, click on ‘← Edit data samples’.
You can delete any data samples which you think don’t fit or add more samples from yourself and other people.
Entraînez à nouveau le modèle et testez-le à nouveau.
Mettez le modèle et le code sur votre micro:bit
Dans micro:bit CreateAI, cliquez sur « Modifier dans MakeCode » pour voir le code du projet dans l'éditeur MakeCode.
You can modify the code or just try it out as it is. Attach your micro:bit using a USB cable, click on the ‘Download’ button in the MakeCode screen, and follow the instructions to transfer your AI model and the code blocks to it.
Attach a battery pack to the micro:bit and put it on, ready to test out.
Collect your data
First press buttons A and B together to delete any old data logs from your micro:bit. Reset the timer by pressing the reset button on the back of the micro:bit. Press button A to start logging and button B to stop logging.
Your data will stay on your micro:bit even if you disconnect the battery or press the reset button.
Analysez vos données
Déconnectez le coupleur de piles et rebranchez la micro:bit sur un ordinateur. Le micro:bit apparaît comme une clé USB appelée MICROBIT. Regardez dans le lecteur MICROBIT et ouvrez le fichier MY_DATA pour voir un tableau de vos données dans un navigateur web :
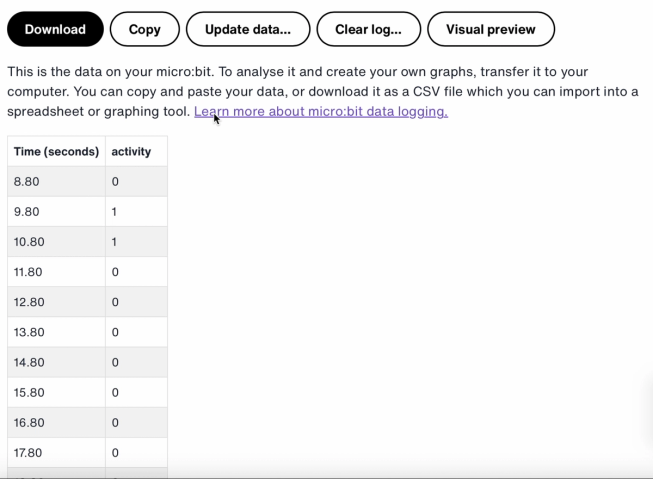
The time stamps in the log represent the amount of time that has passed since your micro:bit was powered on or reset.
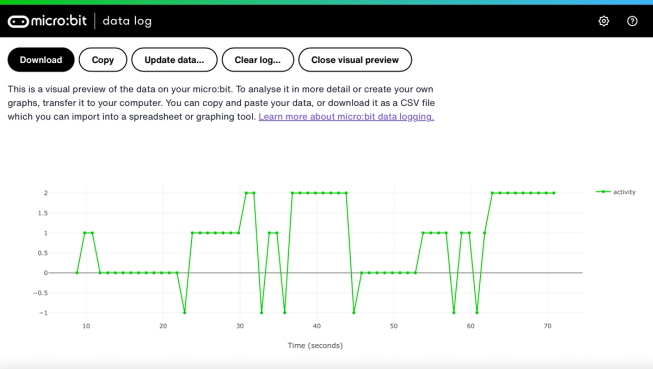
Click on Visual preview to see a graph of your data:
You can also click on the Copy button and then paste your data into a spreadsheet.
Comment fonctionnent les blocs de code
This program uses a variable called ‘logging’. A variable in a computer program is a container for storing data which can be accessed and updated while the program is running. In this program, the variable ‘logging’ controls if the micro:bit is logging or not and can be set to ‘true’ or ‘false’. Variables that can be set to these two values are called ‘Boolean’ variables.
When the program starts, the variable ‘logging’ is set to false. A show icon block is used to display a ‘no’ icon on the LED display to indicate the micro:bit is not logging. The set columns and set timestamp blocks create labels for the data logging table your micro:bit will produce.
The on button A pressed block is used to set logging to ‘true’ and show a ‘yes’ icon on the LED display. The on button B pressed block is used to set logging to ‘false’ and show a ‘no’ icon on the LED display. And the on buttons A + B pressed block sets logging to ‘false’, displays a skull icon, and deletes any log.
Finally, an ‘every’ block is used to check every 1,000 milliseconds or second if the micro:bit is logging. If it is, an ‘if then else’ block is used with ‘is ML detected’ and ‘log data’ blocks to record a 0 if you are still, a 1 if you are walking and a 2 if you are running in your data logging table. If the micro:bit cannot detect what you are doing, it records a -1 in the table. Bigger numbers are used for more active actions, so the resulting data logging graph gives you a clear visual record of how active you have been.
Évaluation
How accurate is the AI sports logger in tracking your movements? How could you improve its accuracy? Who would find this device particularly useful? How does it compare to the Step counter or the Movement data logger projects?
Étape 3 : étendre
- Add a fourth action such as ‘throwing’ for sports like netball or tennis.
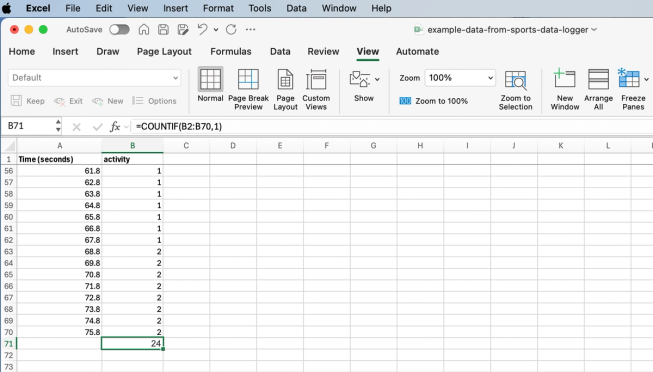
Excel spreadsheet with formula to count certain activity cells
- Add up how much time you spent on each activity. You could do this saving your data as a CSV file, opening it in a spreadsheet and using a formula such as =COUNTIF(B2:B70,1) Where B2:B70 is the range of the activity cells, and 1 is the activity number meaning ‘walking’.
Vous pourriez aussi aimer
Créer un minuteur d'exercice intelligent à l'aide de l'IA
Utilisez la science des données pour améliorer vos compétences sportives
Utilisez l'enregistrement des données pour améliorer votre podomètre.
This content is published under a Creative Commons Attribution-ShareAlike 4.0 International (CC BY-SA 4.0) licence.