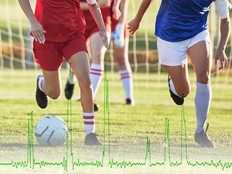
Stwórz rejestrator AI danych sportowych za pomocą micro:bit CreateAI, który będzie rejestrował, ile czasu Ty i inni spędzacie na bieganiu, chodzeniu i pozostawaniu w bezruchu.
Poradnik projektu krok po kroku
Krok 1: Zrozumieć to
Jak to działa?
W tym projekcie będziesz trenował model uczenia maszynowego (ML) do rozpoznawania, gdy biegniesz, idziesz lub pozostajesz w bezruchu.
Będziesz łączyć ten model z programem w MakeCode, który używa funkcji rejestrowania danych micro:bit do zapisywania czynności, jakie wykonujesz co sekundę.
Projekt ten może okazać się przydatny w takich dyscyplinach jak piłka nożna czy siatkówka, gdzie trzeba analizować, jak aktywni są poszczególni zawodnicy. Możesz również użyć go do monitorowania ilości czasu spędzonego na biegu lub chodzeniu podczas przerwy w szkole lub podczas treningu.
Czym jest uczenie maszynowe?
Uczenie maszynowe (ML) jest rodzajem sztucznej inteligencji (AI), w której bazując na danych komputery uczą się i podejmują decyzje.
Modele ML są trenowane przez ludzi, aby pomóc im w podejmowaniu takich decyzji, na przykład, aby rozpoznać różne "akcje", gdy poruszasz swój micro:bit na różne sposoby.
Co będę musiał zrobić?
Systemy AI potrzebują ludzi do projektowania, budowania, testowania i korzystania z nich. Zbierzesz dane, aby wytrenować model ML, przetestować go, ulepszyć i połączyć go z kodem komputerowym, aby stworzyć inteligentne urządzenie, które wykorzystuje AI. Aby to zrobić, użyjesz strony micro:bit i micro:bit CreateAI.
Krok 2: Utwórz
Czego potrzebujesz
- micro:bit V2, kabel USB i zestaw baterii z 2 x bateriami AAA
- Komputer (np. desktop, laptopa lub Chromebook) z dostępem do strony micro:bit CreateAI, za pomocą przeglądarki Chrome lub Edge
- Jeśli twój komputer nie ma włączonego Bluetooth, potrzebujesz dodatkowego micro:bita V2
- Pasek i uchwyt lub inny sposób przymocowania micro:bita do nadgarstka (np. elastyczne tasiemki lub gumki)
- Możesz również znaleźć przydatne porady micro:bit CreateAI
Zbierz próbki danych
Kiedy otworzysz projekt w micro:bit CreateAI, zobaczysz, że daliśmy Ci kilka próbek danych dla akcji "bieganie", "chodzenie" i "w bezruchu":
walking
running
still
Możesz dodać własne próbki ruchu za pomocą czujnika ruchu lub akcelerometru micro:bita.
W micro:bit CreateAI, kliknij przycisk 'Połącz', aby połączyć zebrane dane, i postępuj zgodnie z instrukcjami.
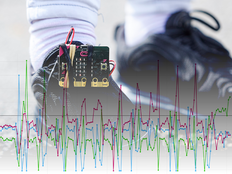
Dołącz micro:bit do zbierania danych do lewego nadgarstka jak zegarek z logo u góry. Kliknij pierwszą akcję, "chodzenie" i kliknij "Rejestruj", aby zapisać własne próbki danych. Jeśli popełnisz błąd, możesz usunąć dowolne próbki, których nie chcesz. Możesz również nacisnąć przycisk B na micro:bicie, aby rozpocząć nagrywanie.
Jeśli chcesz nagrywać w sposób ciągły przez 10 sekund, aby otrzymać 10 próbek, kliknij trzy kropki obok przycisku nagrywania i wybierz tę opcję.
Rejestruj teraz własne próbki danych dla „biegania”, a następnie dla „pozostawania w bezruchu”, upewniając się, że próbki pobierane są w różnych pozycjach, np. z twarz do góry i do dołu.
Trenuj i testuj model
Kliknij przycisk „Trenuj model”, aby trenować model, a następnie przetestować go. Spróbuj chodzić i sprawdź, czy „chodzenie” jest szacowaną czynnością, a następnie spróbuj biec, aby sprawdzić, czy „biegnięcie” jest szacowaną czynnością. Pozostań nieruchomo i sprawdź, czy „nieruchomo” to wartość szacunkowa. Oddaj swój micro:bit komuś innemu do ponoszenia (upewnij się, że ktoś umieści go na tym samym nadgarstku i w tym samym położeniu) i sprawdź, czy działa u niego tak samo dobrze.
Ulepsz swój model
Większość modeli można ulepszyć dzięki większej liczbie danych. Jeśli model wymaga poprawy, kliknij „Edytuj próbki danych”.
Możesz usunąć wszystkie próbki danych, które uważasz, że nie pasują lub dodać więcej próbek od siebie i od innych osób.
Ponownie trenuj i testuj model.
Umieść model i kod na swoim micro:bicie
W micro:bit CreateAI kliknij "Edytuj w MakeCode", aby zobaczyć kod projektu w edytorze MakeCode.
Możesz zmodyfikować kod lub wypróbować go taki, jaki jest. Dołącz swój micro:bit za pomocą kabla USB, kliknij przycisk „Pobierz” na ekranie MakeCode i postępuj zgodnie z instrukcjami dotyczącymi przeniesienia do niego modelu AI i bloków kodu.
Podłącz pakiet bateriię do micro:bita i załóż go, gotowy do testu.
Zbierz swoje dane
Najpierw naciśnij jednocześnie przyciski A i B, aby usunąć wszystkie stare dane z micro:bita. Zresetuj timer naciskając przycisk resetowania na tylnej stronie micro:bita. Naciśnij przycisk A, aby rozpocząć rejestrowanie i przycisk B, aby je zatrzymać.
Twoje dane pozostaną na micro:bicie nawet jeśli odłączysz baterie lub naciśniesz przycisk resetowania.
Analizuj swoje dane
Odłącz pakiet baterii i podłącz micro:bit z powrotem do komputera. micro:bit pojawia się jako dysk USB o nazwie MICROBIT. Spójrz na dysk MICROBIT i otwórz plik MY_DATA, aby zobaczyć tabelę Twoich danych w przeglądarce internetowej:
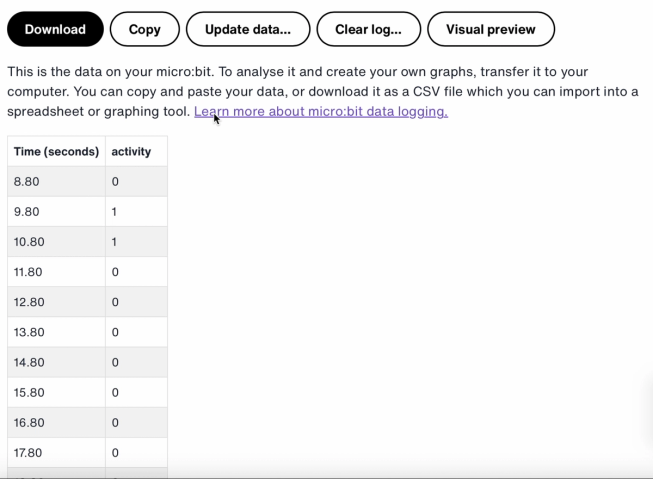
Znaczniki czasu w dzienniku reprezentują czas, który upłynął od włączenia lub resetowania micro:bita.
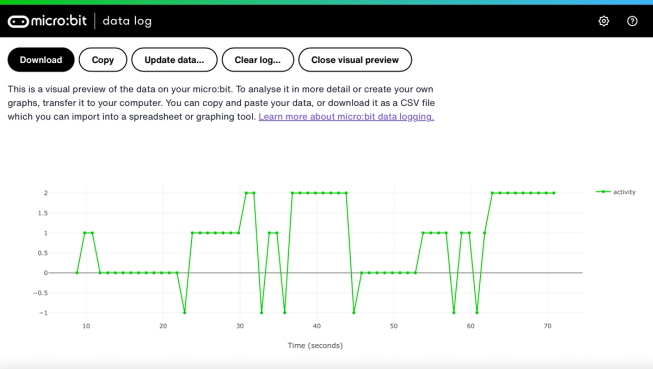
Kliknij Visual preview, aby zobaczyć wykres swoich danych:
Możesz również kliknć przycisk Copy a następnie wkleić swoje dane do arkusza kalkulacyjnego.
Jak działają bloki kodu
Ten program używa zmiennej o nazwie „logging”. Zmienna w programie komputerowym jest pojemnikiem do przechowywania danych, które można uzyskać i aktualizować podczas działania programu. W tym programie zmienna „logging” kontroluje, czy micro:bit rejestruje dane, czy nie, i można ją ustawić na „true” lub „false”. Zmienne, które mogą mieć te dwie wartości, nazywane są zmiennymi logicznymi.
Gdy program startuje, zmienna "logging" jest ustawiona na false. Blok ikony programu jest używany do wyświetlania ikony „no” na wyświetlaczu LED, aby wskazać, że micro:bit nie rejestruje danych. Ustawione kolumny i ustawione bloki znacznika czasu tworzą etykiety dla tabeli rejestracji danych, którą będzie produkował Twój micro:bit.
Blok "gdy przycisk A naciśnięty" jest używany do ustawiania rejestrowania danych na „true” i pokazania ikony „yes” na wyświetlaczu LED. Blok "gdy przycisk B naciśnięty" jest używany do ustawiania rejestrowania danych na „false” i pokazania ikony „no” na wyświetlaczu LED. A blok "gdy przyciski A + B są naciśnięte" ustawia rejestrowanie danych na "false", wyświetla ikonę czaszki i usuwa jakikolwiek wpis.
Wreszcie, blok "wszystkie" jest używany do sprawdzania co 1000 milisekund lub sekundę, czy micro:bit rejestruje dane. Jeśli tak jest, że blok „jeśli wtedy w przeciwnym razie” jest użyty z blokami „jest wykryty ML” i „rejestruj dane” w celu zapisania 0, jeśli pozostajesz w spokoju, 1, jeśli chodzicie a 2, jeśli biegniesz w tablicy rejestrowania danych. Jeśli micro:bit nie może wykryć tego, co robisz, zapisuje -1 w tabeli. Większe liczby są używane do bardziej aktywnych działań, dlatego powstały wykres rejestrowania danych daje czytelniejszy wizualny zapis Twojej aktywności.
Ewaluacja
Jak dokładnie rejestrator sportowy AI śledzi Twoje ruchy? Jak można poprawić jego dokładność? Komu takie urządzenie może się szczególnie przydać? Jak wypada w porównaniu z projektami licznika kroków i rejestratora danych ruchu?
Krok 3: Rozszerzenie
- Dodaj czwarte działanie, takie jak „rzucanie” dla sportu, jak siatkówka czy tenis.
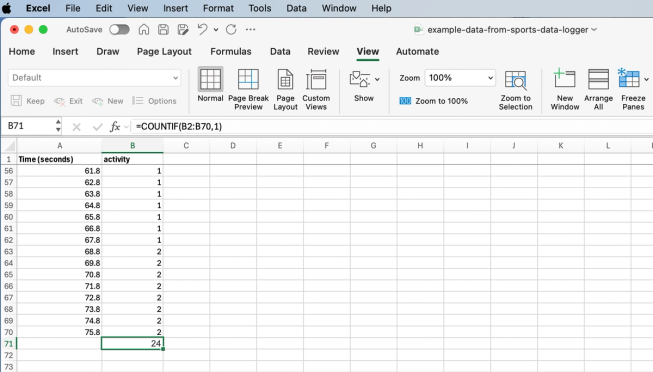
Arkusz kalkulacyjny programu Excel z formułą do zliczania określonych komórek aktywności
- Dodaj, ile czasu spędziłeś na każdej aktywności. Możesz to zrobić, zapisując swoje dane jako plik CSV, otwierając go w arkuszu kalkulacyjnym i używając wzoru takiego, jak =COUNTIF(B2:B70,1), gdzie B2:B70 jest zakresem komórek aktywnych, a 1 jest numerem aktywności oznaczającym „chodzenie”.
Może Ci się spodobać
Zrób inteligentny timer ćwiczeń z wykorzystaniem AI
Użyj danalogii do poprawy swoich umiejętności sportowych
Użyj rejestratora danych, aby stworzyć lepszy licznik kroków.
This content is published under a Creative Commons Attribution-ShareAlike 4.0 International (CC BY-SA 4.0) licence.