Purpose of this guide
This guide is for teachers and professionals who work with students with deafness or hearing loss. It highlights some common challenges these students may face and suggests adaptations and practical advice.
There are separate guides focusing on working with students with fine motor and mobility challenges and with visual impairments.
We welcome contributions to help us cover more scenarios or solutions. Send your thoughts, ideas, and comments to us at accessibility@microbit.org. We are hoping the community will help ensure this guide is accurate and stays relevant.
Common challenges
This section lists common challenges faced by students with deafness or hearing loss when using the BBC micro:bit. Each challenge links to suggested workarounds detailed in the guidance section.
Understanding technical vocabulary
Understanding technical vocabulary
Accessing audio output
Accessing audio output
Including different senses
Including different senses
Specific guidance
Classroom glossaries and resources
Learning key vocabulary in a new topic is important for all learners. Students with deafness and hearing loss particularly benefit from pre-learning key terms and having regular opportunities to review new vocabulary.
The micro:bit website features a classroom glossary and a CreateAI glossary as well as a range of classroom resources to help you support all students.
For users of sign language, we have collated a sign language glossary including British and American Sign Language.
Different sensory outputs
Students with deafness and hearing loss may benefit from using a wide range of sensory outputs in their projects.
Auditory outputs
For those students who do want to experiment with sounds, the micro:bit offers a range of sound-based outputs including distinct and playful sound effects. There are many sound-based accessories available to expand your options. The micro:bit V2 also features a built-in sound sensor for measuring sound, which can be used to translate ambient sound into visual or tactile output.
It is also possible to change the frequency of sounds in existing projects to match individual hearing ranges and sensitivity.
Visual outputs
As well as the built-in LEDs for visual output, there are many display accessories available to extend the micro:bit in different visual ways.
Tactile outputs
You may also explore vibration output by attaching a small vibration motor as seen in this CalmCuff instructable or by incorporating a vibration motor component.
There are also many electronics kits available to extend the micro:bit to support physical components such as servos.
Using headphones or a speaker
Both the micro:bit V1 and V2 allow you to connect headphones or a speaker for sound output. The micro:bit V2 also features a built-in speaker, so you can add sound effects without any additional hardware.
Most Microsoft MakeCode music blocks work with both versions, but some blocks (found in the “micro:bit V2” group at the bottom of the Music category) only work with the V2. This Frère Jacques project is an example of a sound-based project suitable for both the micro:bit V1 and V2.
When using headphones or a speaker with a micro:bit V2, you may want to add a ‘set built-in speaker: OFF’ block to your program to prevent sound coming from both the built-in speaker and your connected audio device.
Connecting to hearing devices
It may be possible to use the same methods described in connect headphones or a speaker to connect directly to a hearing aid or sound processor, by using an intermediate Bluetooth device. You’ll need a device that accepts a 3.5mm audio cable as input, such as the Phonak ComPilot or ReSound Multi Mic. Use a 3.5mm Mono Audio Plug to Alligator Clips adaptor to connect directly from pin 0 and ground to your Bluetooth device’s audio input plug.
Add visual output to auditory projects
Most micro:bit sample projects that feature audio output also include visual output (such as icons or text) to make them suitable for both the micro:bit V1 and micro:bit V2, with the exception of musical projects that have very specific musical timing.
If you are using a custom project that uses sound as the primary output, consider adding visual blocks to make it more accessible. For example, this conductivity tester uses both an icon and a tone to tell you when a conductive material has been placed between the two leads.
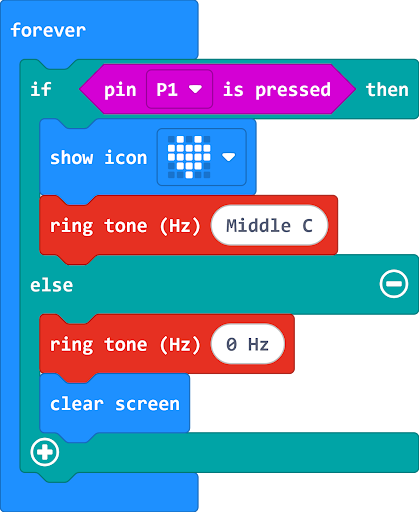
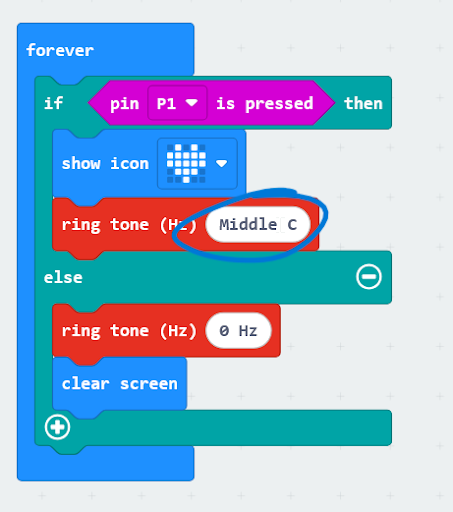
Change the frequency of sounds
If your student struggles to hear a certain frequency of notes, you may wish to adapt an existing project to change the frequency of the output sound. For example, in this conductivity tester project (shown below) you might select the ‘Middle C’ note in the ‘ring tone’ block to change it to a lower frequency. You can specify a new frequency by typing a different number (in Hz) in the text field, or by clicking on a note on the piano interface.
Related links
- Science Channel KS4 Physics - Heathlands School includes some British Sign Language explanations of electronic circuits
- micro:bit LIVE 2021 | Design with Code - A different approach to coding with kids briefly includes mention of coding with deaf students at Rocky Mountain Deaf School
- Sound meter project | micro:bit
- Vibrating Mini Motor Disc - The Pi Hut
- Deaf Kids Code
Third party content
This document includes links to third party content. We have included these as examples of products or resources that may be useful. However, the Micro:bit Educational Foundation does not have any official link to these products.
Contribute your feedback
We welcome contributions to help us cover more scenarios or solutions. Send your thoughts, ideas, and comments to us at accessibility@microbit.org. We are hoping the community will help ensure this guide is accurate and stays relevant.