Crea un registrador de datos deportivos de IA con micro:bit CreateAI que registre cuánto tiempo pasas tú y otras personas corriendo, caminando y estando quietos.
Guía del proyecto paso a paso
Paso 1: Entiéndelo
¿Cómo funciona?
En este proyecto, entrenarás un modelo de aprendizaje automático (ML) para que reconozca cuándo estás corriendo, caminando o quieto.
Combinarás ese modelo con un programa de MakeCode que utiliza la función de registro de datos de la micro:bit para grabar la acción que estás realizando cada segundo.
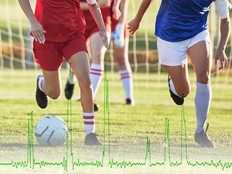
Este proyecto podría ser útil en deportes como el fútbol o el netball, en los que es necesario analizar el nivel de actividad de determinados jugadores. También podrías usarlo para monitorear cuánto tiempo has pasado corriendo o caminando durante los recreos escolares o durante un entrenamiento.
¿Qué es el aprendizaje automático?
El aprendizaje automático (ML) es un tipo de inteligencia artificial (IA) donde los ordenadores pueden aprender de los datos y tomar decisiones basándose en ellos.
Los modelos de ML son entrenados por humanos para ayudarles a tomar esas decisiones, por ejemplo, para reconocer diferentes "acciones" cuando mueves tu micro:bit de diferentes maneras.
¿Qué tendré que hacer?
Los sistemas de IA necesitan humanos para diseñarlos, construirlos, probarlos y usarlos. Recopilarás datos para entrenar un modelo de aprendizaje automático (ML), lo probarás, lo mejorarás y lo combinarás con programas informáticos para crear un dispositivo inteligente que utilice IA. Para ello utilizarás un micro:bit y el sitio web de micro:bit CreateAI.
Paso 2: Créalo
Lo que necesitas
- Una micro:bit V2, cable USB y un paquete de baterías con 2 pilas AAA.
- Un ordenador (por ejemplo, de escritorio, portátil o Chromebook) con acceso al sitio web micro:bit CreateAI, utilizando un navegador web Chrome o Edge
- Si tu ordenador no tiene Bluetooth activado, necesitarás un micro:bit V2 adicional
- Una correa y soporte, o alguna otra forma de sujetar la micro:bit a tu muñeca (por ejemplo, precintos flexibles o bandas elásticas)
- También puedes encontrar útiles nuestros consejos de enseñanza de micro:bit CreateAI útiles
Recopila muestras de datos
Cuando abras el proyecto en micro:bit CreateAI, verás que ya te hemos proporcionado algunas muestras de datos para las acciones de "running" (correr), "walking" (caminar) y "still" (quieto):
walking
running
still
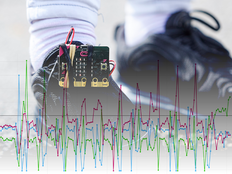
Puedes añadir tus propias muestras de movimiento utilizando el sensor de movimiento o acelerómetro de la micro:bit.
En micro:bit CreateAI, pulsa en el botón "Connect" para conectar tu micro:bit de recolección de datos y sigue las instrucciones.
Coloca la micro:bit de recolección de datos en tu muñeca izquierda como si fuera un reloj, con el logotipo en la parte superior. Pulsa en la primera acción, "walking" (caminar), y después en "Record" (Grabar) para registrar tus propias muestras de datos. Si cometes un error, puedes eliminar las muestras que no quieras. También puedes presionar el botón B en la micro:bit para comenzar la grabación.
Si deseas grabar de forma continua durante 10 segundos para obtener 10 muestras, pulsa en los tres puntos junto al botón de grabar y selecciona esa opción.
Ahora registra tus propias muestras de datos para la acción de "running" (correr), y luego para la acción de "still" (quieto), asegurándote para "still" de recolectar muestras en diferentes posiciones, como boca arriba y boca abajo.
Entrena y prueba el modelo
Pulsa en el botón "Train model" (Entrenar modelo), y luego pruébalo. Prueba a caminar y comprueba si «caminar» es la acción prevista, después corre para ver si «correr» es la acción prevista. Quédate quieto y comprueba si «quieto» es lo previsto. Dale tu micro:bit a otra persona para que se lo ponga (asegurándote de que lo coloca en la misma muñeca y con la misma orientación) y comprueba si también le funciona.
Mejora tu modelo
La mayoría de los modelos pueden mejorarse con más datos.
Si es necesario mejorar el modelo, pulsa en "← Editar ejemplos de datos".
Puedes eliminar cualquier muestra de datos que creas que no encaja o añadir más muestras tuyas y de otras personas.
Vuelve a entrenar el modelo y pruébalo nuevamente.
Pon el modelo y el código en tu micro:bit
En micro:bit CreateAI, pulsa en "Edit in MakeCode" (Editar en MakeCode) para ver el código del proyecto en el editor de MakeCode.
Puedes modificar el código o simplemente probarlo tal como está. Conecta tu micro:bit usando un cable USB, pulsa en el botón "Download" (Descargar) en la pantalla de MakeCode y sigue las instrucciones para transferir tu modelo de IA y los bloques de código.
Conecta un paquete de baterías a la micro:bit y póntela, lista para probar.
Recoge tus datos
Primero presiona los botones A y B juntos para eliminar cualquier registro de datos antiguos de tu micro:bit. Reinicia el contador de tiempo presionando el botón de reinicio en la parte posterior de la micro:bit. Presiona el botón A para comenzar a registrar y el botón B para detener el registro.
Tus datos permanecerán en tu micro:bit incluso si desconectas la batería o presionas el botón de reinicio.
Analiza tus datos
Desconecta la batería y vuelve a conectar el micro:bit a un ordenador. El micro:bit aparece como una unidad USB llamada MICROBIT. Busca en la unidad MICROBIT y abre el archivo MY_DATA para ver una tabla de tus datos en un navegador web:
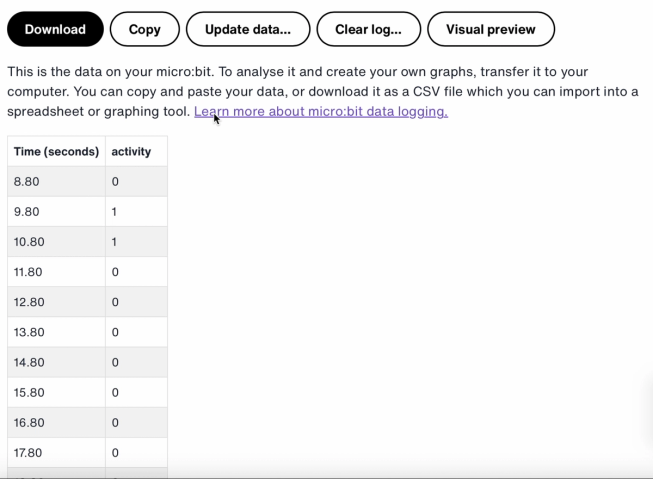
Los sellos de tiempo en el registro representan la cantidad de tiempo que ha transcurrido desde que tu micro:bit se encendió o se reinició.
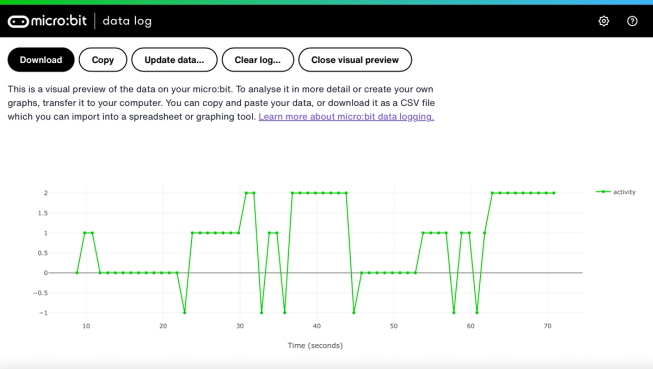
Haz clic en Visual preview (Vista previa visual) para ver un gráfico de tus datos:
También puedes hacer clic en el botón Copy (Copiar) y luego pegar tus datos en una hoja de cálculo.
Cómo funcionan los bloques de código
Este programa utiliza una variable llamada 'logging' (registrando). Una variable en un programa ordenador es un contenedor para almacenar datos a los que se puede acceder y actualizar mientras el programa está en ejecución. En este programa, la variable "logging" controla si la micro:bit está registrando datos o no y puede establecerse como "true" (verdadero) o "false" (falso). Las variables que pueden establecerse con estos dos valores se denominan variables "Booleanas".
Cuando el programa comienza, la variable "logging"' se establece en falso. Se utiliza un bloque de mostrar icono para mostrar un icono de "no" en la pantalla LED, indicando que la micro:bit no está registrando. Los bloques establecer columnas y establecer marca de tiempo crean etiquetas para la tabla de registro de datos que producirá tu micro:bit.
El bloque al presionar el botón A se utiliza para establecer "logging" en "true" y mostrar un icono de "sí" en la pantalla LED. El bloque al presionar el botón B se utiliza para establecer "logging" en "false" y mostrar un icono de "no" en la pantalla LED. Y el bloque al presionar botones A + B establece "logging" en "false", muestra un icono de calavera y elimina cualquier registro.
Finalmente, se utiliza un bloque "every' para verificar cada 1.000 milisegundos o un segundo si la micro:bit está registrando. Si lo está, se utiliza un bloque ‘if then else’ con los bloques ‘is ML detected’ y ‘log data’ para grabar un 0 si estás quieto, un 1 si estás caminando y un 2 si estás corriendo en tu tabla de registro de datos. Si la micro:bit no puede detectar lo que estás haciendo, registra un -1 en la tabla. Se utilizan números más grandes para las acciones más activas, por lo que el gráfico de registro de datos resultante te proporciona un registro visual claro de cuán activo has estado.
Evaluación
¿Qué tan preciso es el registrador deportivo de IA en el seguimiento de tus movimientos? ¿Cómo podrías mejorar su precisión? ¿Quién encontraría este dispositivo particularmente útil? ¿Cómo se compara con los proyectos de Contador de pasos o Registrador de datos de movimiento?
Paso 3: extiéndelo
- Añade una cuarta acción como 'throwing' (lanzar) para deportes como el netball o el tenis.
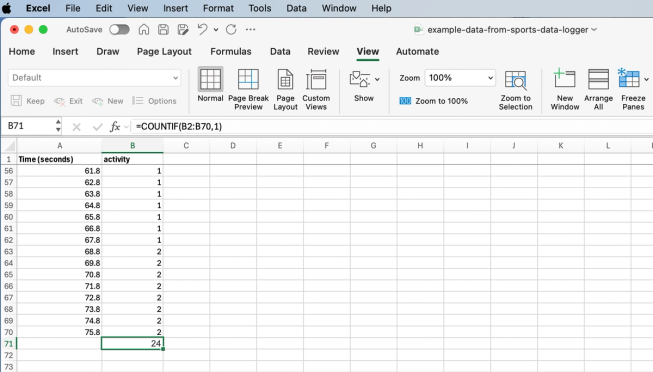
Hoja de cálculo de Excel con fórmula para contar ciertas celdas de actividad
- Suma cuánto tiempo dedicaste a cada actividad. Podrías hacer esto guardando tus datos como un archivo CSV, abriéndolo en una hoja de cálculo y usando una fórmula como =COUNTIF(B2:B70,1) donde B2:B70 es el rango de las celdas de actividad, y 1 es el número de actividad que significa 'walking' (caminar).
También podría gustarte
Crea un temporizador de ejercicio inteligente utilizando IA
Utiliza la ciencia de datos para mejorar tus habilidades deportivas
Utiliza el registro de datos para mejorar el contador de pasos.
This content is published under a Creative Commons Attribution-ShareAlike 4.0 International (CC BY-SA 4.0) licence.