Maak een AI sport data beheerder met micro:bit CreateAI die vast legt hoeveel tijd jij en anderen besteden aan rennen, lopen en stil zijn.
Stap-voor-stap projectgids
Stap 1: Begrijp het
Hoe werkt het?
In dit project ga je een Machine Learning (ML) model trainen om te herkennen wanneer je aan het sporten bent en wanneer je niet aan het sporten bent.
Je zult dat model combineren met een MakeCode programma dat de micro:bit's gegevens vastleggen functie gebruikt om elke seconde vast te leggen welke actie je doet.
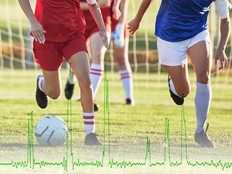
Dit project zou nuttig kunnen zijn voor sporten als voetbal of netbal waarbij je moet analyseren hoe actief bepaalde spelers zijn. Je zou het ook kunnen gebruiken om te controleren hoeveel tijd je hebt besteed aan het rennen of lopen tijdens schoolpauzes of tijdens een training.
Wat is machine learning?
Machine learning (ML) is een vorm van kunstmatige intelligentie (AI) waarbij computers kunnen leren en besluiten kunnen nemen op basis van gegevens.
De ML-modellen zijn door mensen getraind om hen te helpen deze beslissingen te nemen, bijvoorbeeld om verschillende 'acties' te herkennen wanneer je je micro:bit op verschillende manieren verplaatst.
Wat moet ik doen?
AI-systemen hebben mensen nodig om ze te ontwerpen, te bouwen, te testen en te gebruiken. Je gaat gegevens verzamelen om een ML-model te trainen, te testen, te verbeteren en te combineren met computercode om een slim apparaat te maken dat AI gebruikt. Je gaat een micro:bit en de micro:bit CreateAI website gebruiken om dit te doen.
Stap 2: Maak het
Benodigdheden
- Een micro:bit V2, USB-kabel en een batterijpakket met 2 x AAA batterijen
- Een computer (bijv. desktop, laptop, of Chromebook) met toegang tot de micro:bit CreateAI website, met behulp van een Chrome of Edge web browser
- Als je computer Bluetooth niet ingeschakeld heeft, heb je een extra micro:bit V2 nodig
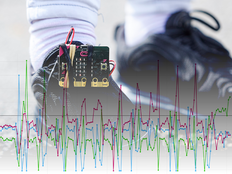
- Een bandje en houder, of een andere manier om de micro:bit aan je pols vast te maken (bijv. flexibele pijpenragers of elastiekjes)
- Je kunt ook onze micro:bit CreateAI lestips nuttig vinden
Verzamel data samples
Wanneer je het project opent in micro:bit CreateAI, zie je een aantal data samples voor 'rennen', 'wandelen' en 'stil' acties:
walking
running
still
Je kunt je eigen voorbeelden van de bewegingen toevoegen door gebruik te maken van micro:bit'sbewegingssensor of acellerometer.
In micro:bit CreateAI, klik op de 'Verbinden' knop om je data collectie micro:bit te koppelen en volg de instructies.
Bevestig de micro:bit voor gegevensverzameling aan je linkerpols als een horloge, met het logo bovenaan. Klik op de eerste actie, 'lopen' en klik op 'Opnemen' om jouw eigen data samples op te nemen. Als je een fout maakt, kun je alle samples verwijderen die je niet wilt. Je kunt ook op knop B op de micro:bit drukken om de opname te starten.
Als je continu wilt opnemen gedurende 10 seconden om 10 samples te krijgen, klik op de drie stippen naast de opnameknop en selecteer die optie.
Neem nu je eigen data samples op voor de ‘rennen’ en dab de ‘stil’-acties, zorg ervoor dat je voor 'stil' samples verzamelt op verschillende posities, zoals naar boven en naar beneden.
Train en test het model
Klik op de knop 'Train model' om het model te trainen en vervolgens te testen. Probeer eens te lopen en kijk of ‘lopen’ de geschatte actie is, dan of ‘rennen’ de geschatte actie is. Blijf staan en kijk of 'still' wordt ingeschat. Geef je micro:bit aan iemand anders om te dragen (zorg ervoor dat ze het op dezelfde pols en in dezelfde oriëntatie plaatsen) en kijk of het net zo goed werkt voor hen.
Verbeter je model
De meeste modellen kunnen worden verbeterd met meer gegevens. Als het model verbeterd moet worden, klik dan op ‘← Bewerk data samples’.
Je kunt alle data samples verwijderen die volgens je niet passen of van jezelf of andere mensen meer samples toevoegen.
Train het model opnieuw en test het opnieuw.
Plaats het model en de code op je micro:bit
Klik in micro:bit CreateAI op 'Bewerk in MakeCode' om de project code te zien in de MakeCode editor.
Je kunt de code wijzigen of het gewoon uitproberen zoals het nu is. Verbind je micro:bit met behulp van een USB-datakabel, klik op de 'Download' knop in het MakeCode scherm en volg de instructies om je AI model en de codeblokken naar de micro:bit te verplaatsen.
Bevestig een batterijpakket aan de micro:bit en zet het aan, klaar om te testen.
Verzamel je gegevens
Druk eerst op knoppen A en B samen om oude data logs van je micro:bit te verwijderen. Reset de timer door op de resetknop op de achterkant van de micro:bit te drukken. Druk op knop A om te beginnen met loggen en knop B om te stoppen met loggen.
Je gegevens blijven op je micro:bit staan, zelfs als je de batterij loskoppelt of op de reset knop drukt.
Analyseer je gegevens
Koppel het batterijpakket los en sluit de micro:bit weer aan op een computer. De micro:bit verschijnt als een USB schijf genaamd MICROBIT. Kijk in het MICROBIT station en open het MIJN_DATA bestand om een tabel met je gegevens in een webbrowser te zien:
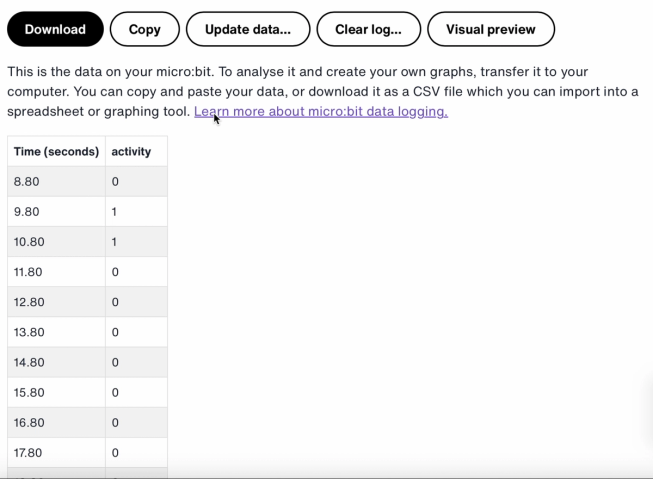
De tijdstempels in het logboek vertegenwoordigen de hoeveelheid tijd die is verstreken sinds je micro:bit is ingeschakeld of gereset.
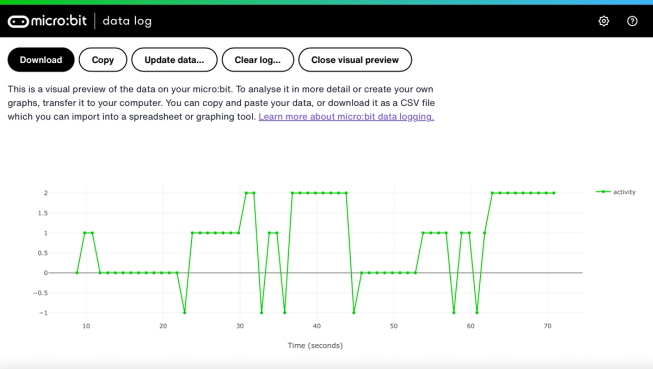
Klik op Visuele weergave om een grafiek van je gegevens te zien:
Je kunt ook klikken op de Kopieer-knop en vervolgens je gegevens in een spreadsheet plakken.
Hoe de codeblokken werken
Dit programma gebruikt van een variabele genaamd 'logging'. Een variabele in een computerprogramma is een container voor het opslaan van gegevens die tijdens het uitvoeren van het programma kunnen worden benaderd en bijgewerkt. In dit programma bepaalt de variabele 'logging' of de micro:bit logt of niet en kan worden ingesteld op 'waar' of 'onwaar'. Variabelen die kunnen worden ingesteld op deze twee waarden worden 'Boolean' variabelen genoemd.
Wanneer het programma start, is de variabele 'logging' ingesteld op false. Een toon pictogram-blok wordt gebruikt om een 'nee' icoon op het LED-scherm weer te geven om aan te geven dat de micro:bit niet logt. De stel kolommen in- en stel tijdstempel in-blokken maken labels voor de data logging tabel die je micro:bit produceert.
Het wanneer knop A ingedrukt-blok wordt gebruikt om logging op ‘true’ in te stellen en een ‘ja’-pictogram op het LED-scherm te tonen. Het wanneer knop B ingedrukt-blok wordt gebruikt om logging op ‘false’ in te stellen en een ‘no’-pictogram op het LED-scherm te tonen. En het wanneer knoppen A + B ingedrukt-blok stelt het loggen in op ‘false’, toont een schedel-pictogram en verwijdert alle logging.
Tot slot wordt een 'elk' blok gebruikt om elke 1.000 milliseconden of seconden te controleren of de micro:bit aan het loggen is. Zo ja, wordt een 'als dan anders' blok gebruikt met 'is ML gedetecteerd' en 'log data' blokken om een 0 op te nemen als je stil bent, een 1 als je loopt en een 2 als je bezig bent met het rennen, op te nemen in jouw data logging tabel. Als de micro:bit niet kan detecteren wat je doet, dan registreert het een -1 in de tabel. Grotere getallen worden gebruikt voor meer actieve acties dus de resulterende data logging grafiek geeft je een duidelijke visuele melding van hoe actief je bent geweest.
Beoordeling
Hoe accuraat is de AI sport logger bij het volgen van jouw bewegingen? Hoe kun je de nauwkeurigheid ervan verbeteren? Wie zou dit apparaat bijzonder nuttig kunnen vinden? Hoe vergelijkt het met de stappenteller-project of het loggerproject voor bewegingsgegevens?
Stap 3: Breid het uit
- Voeg een vierde actie toe, zoals het “gooien” voor sporten als netbal of tennis.
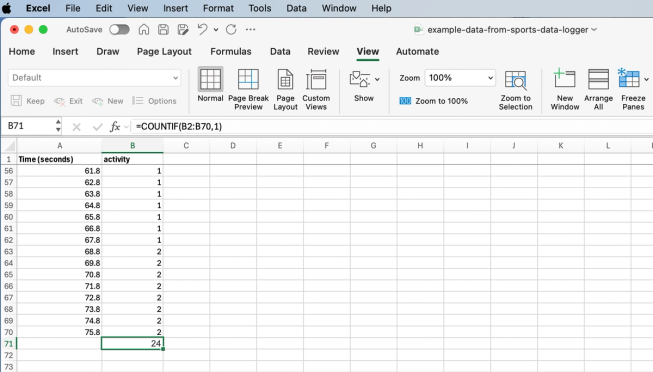
Excel spreadsheet met formule om bepaalde activiteitscellen te tellen
- Voeg toe hoeveel tijd je aan elke activiteit hebt besteed. Je kunt je gegevens opslaan als CSV-bestand, in een spreadsheet openen en een formule gebruiken zoals =COUNTIF(B2:B70,1), waarbij B2:B70 het bereik is van de activiteitscellen, en 1 is het activiteitnummer dat betekent ‘lopen’.
Misschien vindt u dit ook leuk
Maak een slimme sport timer met AI
Gebruik data wetenschap om je sportvaardigheden te verbeteren
Gebruik data logging om een betere stappenteller te maken.
This content is published under a Creative Commons Attribution-ShareAlike 4.0 International (CC BY-SA 4.0) licence.