Make an AI light switch with micro:bit CreateAI that makes a light turn on when you clap and turn off when you wave.
逐步專案指南
步驟 1:了解它
How does it work?
In this project, you’ll train a machine learning (ML) model to recognise when you’re clapping and waving.
You’ll combine that model with a MakeCode program that sends a ‘lightsOn’ radio signal to another micro:bit whenever you clap, and a ‘lightsOff’ radio signal whenever you wave.
When the receiver micro:bit receives the ‘lightsOn’ signal, all its LEDs light up. When it receives the ‘lightsOff’ signal, it clears its LED display.
什麼是機器學習?
機器學習 (ML) 是人工智慧 (AI) 的一種,電腦可以根據數據進行學習並做出決策。
ML 模型經過人類訓練來幫助它們做出這些決策,例如,當您以不同方式移動您的 micro:bit 時辨識不同的「動作」。
我將需要做些什麼?
人工智慧系統需要人類來設計、建造、測試和使用它們。 You'll collect data to train an ML model, test it, improve it, and combine it with computer code to make a smart device that uses AI. 您將運用 micro:bit 和 micro:bit CreateAI 網站來做這件事。
步驟 2:建立它
你需要的東西
- Two micro:bit V2s, USB cable, one or two battery packs
- 一台電腦(像是桌上型電腦、膝上型電腦或 Chromebook),能夠存取 micro:bit CreateAI 網站,並使用 Chrome 或 Edge 瀏覽器
- 如果您的電腦沒有具備藍牙功能,則需要額外的 micro:bit V2
- A strap and holder, or another way to attach the micro:bit to you (e.g. flexible craft stems or elastic bands)
- 您可能也會發現我們的micro:bit CreateAI 教學技巧很有用
收集數據樣本
When you open the project in micro:bit CreateAI, you’ll see we’ve given you some data samples for ‘waving’, 'clapping’ and ‘still’ actions:
waving
clapping
still
You can add your own movement samples using the micro:bit's movement sensor or accelerometer.
在 micro:bit CreateAI 中,點擊「連線」按鍵來連接您的數據收集 micro:bit 並依照指示進行操作。
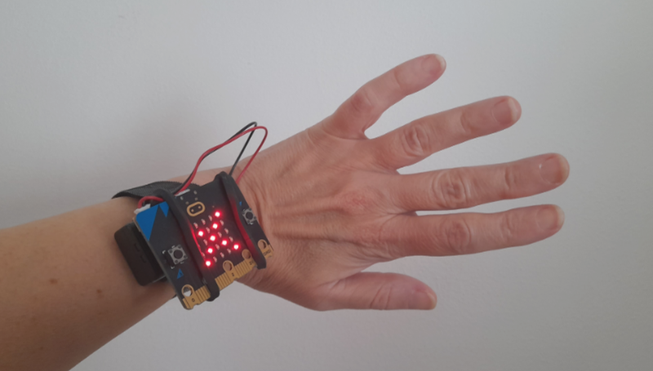
Attach the micro:bit to your wrist. Click on the first action, ‘waving’, and click 'Record'. 如果您犯了錯誤,您可以刪除任何您不需要的樣本。 您也可以按下 micro:bit 上的按鍵 B 開始錄製。
If you would like to record continuously for 10 seconds to get 10 samples, click on the three dots next to the record button and select that option.
Now record your own data samples for the ‘clapping’ and 'still' actions, making sure for 'still' that you collect samples in different positions, such as facing up and down.
訓練和測試模型
Click the ‘Train model’ button to train the model. Try clapping, waving and keeping still to see if those actions are estimated. Give your micro:bit to someone else to wear (making sure they put it on the same wrist and in the same orientation) and see if it works as well for them.
改進您的模型
大多數模型都可以藉由更多數據進行改進。 If the model needs improving, click on ‘← Edit data samples’.
You can delete any data samples which you think don’t fit or add more samples.
再次訓練模型,然後再次測試。
將模型及程式碼放置在您的 micro:bit 上
在 micro:bit CreateAI 中,點擊「在 MakeCode 內編輯」以在 MakeCode 編輯程式中查看專案程式碼。
You can modify the code or just try it out as it is. Attach the first micro:bit using a USB cable, click on the ‘Download’ button in the MakeCode screen, and follow the instructions to transfer your AI model and the code blocks to it. Afterwards, download again onto another micro:bit.
Attach a battery pack to the sender micro:bit. You can keep the receiver micro:bit plugged into the computer or attach it to battery pack. Now wear the sender micro:bit and test it out.
程式碼區塊如何運作
When the program starts, the radio group is set to 52. Radio groups are like channels, so any micro:bit using the same group will get the message. 您可以在 0-255 之間選擇任何您喜歡的群組號碼。 If you are using this project in a class or coding club, you might like to encourage each pair or group of students to use a different radio group from others in the class.
The 'on ML... start' blocks are triggered when the sender micro:bit’s ML model decides you have started waving, clapping or being still.
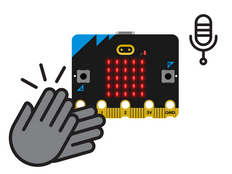
If you are clapping, the ‘on ML clapping start’ block causes a tick icon to appear on the LED display of the sender micro:bit and the radio message ‘lightsOn’ to be sent to the receiver micro:bit. If you are waving, the ‘on ML waving start block’ causes a cross icon to appear on the LED display of the sender micro:bit and the radio message ‘lightsOff’ to be sent to the receiver micro:bit.
If you are still or the sender micro:bit can’t recognise your movements, the LED display is cleared and no radio message is sent.
The ’on radio received’ blocks turn on all the LEDs on the receiver micro:bit if a message is received saying ‘lightsOn’ and clear the screen if a message is received saying ‘lightsOff’.
The ‘on radio received lightsOn / lightsOff’ blocks are from a MakeCode extension called ‘Radio broadcast’. If you want to code this project yourself, you can find the blocks by clicking on ‘Extensions’ then choosing ‘Radio broadcast’.
評量
How accurate is the light switch in turning on and off in response to your movements? How could you improve it, if needed?
How useful would this device be in real life? How does it compare to a regular light switch?
步驟 3:擴展它
- You could light up a room by putting the same code on multiple micro:bits. Keep the other micro:bits still while someone moves another to turn them all on or off.
- Add a fourth action which causes the receiver micro:bit to show dimmed lights. Use the ‘set brightness’ block, found in the LED section under ‘More’.
您可能也喜歡
This content is published under a Creative Commons Attribution-ShareAlike 4.0 International (CC BY-SA 4.0) licence.