步驟1:製作
它是什麼?
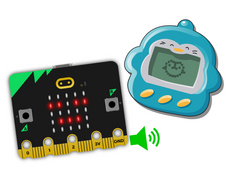
製作一個會利用光和聲音做出反應的感官玩具。
介紹
編程指引
您將學到什麼
- How to use the micro:bit's built-in accelerometer sensor inputs and expressive sounds as outputs to create a toy that could help learners who respond well to stimulation through touch, light and sound. 當您以不同的方式移動時,它發出的聲音和顯示的圖像也會有所不同。
運作方式
- micro:bit 的內建加速器感測器可以測量作用力。
- micro:bit 根據加速度感測器的讀數來觸發對不同移動方式的不同處理方法。
- 如果您搖晃 micro:bit,它的內建揚聲器會發出咯咯笑的聲音,同時在 LED 螢幕上顯示一個笑臉。
- 不同的圖標和聲音輸出是由不同的動作所觸發的,如左右傾斜 micro:bit 或將它的標誌朝上或朝下放。
你需要的東西
- V2 micro:bit (or MakeCode simulator)
- MakeCode 或, Python 編輯器
- 電池組(選配)
步驟2:編碼
1from microbit import *
2import audio
3
4while True:
5    if accelerometer.was_gesture('shake'):
6        display.show(Image.SURPRISED)
7        audio.play(Sound.GIGGLE)
8    if accelerometer.was_gesture('up'):
9        display.show(Image.HAPPY)
10        audio.play(Sound.HELLO)
11    if accelerometer.was_gesture('down'):
12        display.show(Image.ASLEEP)
13        audio.play(Sound.YAWN)
14    if accelerometer.was_gesture('left'):
15        display.show(Image.ARROW_W)
16        audio.play(Sound.SLIDE)
17    if accelerometer.was_gesture('right'):
18        display.show(Image.ARROW_E)
19        audio.play(Sound.SOARING)
20步驟3:進階
- Add different pictures and sounds when you press button A or B or touch the logo.
- Experiment with different expressive sounds like 'giggle', 'happy' and 'twinkle'.
- 為每一種移動方式添加您自己的圖片或者動畫。
- 為 micro:bit 和電池組製作一個外殼或支架讓聲音能夠發出並且 LED 螢幕能夠發光,也許可以擴散一些 LED 光線。
- 如果您是一位老師,你可能會對我們的 Sensory classroom 課程感興趣。